This is a discussion topic for the original post at How to create Desktop Automations just like Selenium - Botcity | Blog
Web pages and applications use HTML and Javascript to provide an interface for the user of a page or system. Since those technologies are interpreted by the browser, the web application’s code, or at least the user interface’s part, is open to anyone accessing the page.
Seeing how those codes are produced by people (programmers) and interpreted in their original form (there is no format conversion like when a compiler is being used), they can be comprehended by anyone with knowledge in web applications development.
All of those characteristics lead to web automations being created by direct interaction with the page elements, with Selenium being a good example, especially thanks to Selenium IDE for Chrome. In this type of automation, the developer reads and swaps values from the interface components using, mostly, the explicit identifiers of these components in the source code. To make that possible, Selenium provides a web driver built into the browser that allows one to access and modify the source code when navigating the web.

But what about Desktop?
When we move to the desktop applications environment, we see a different scenario. Unlike in the web environment, with open technologies, protocols and patterns followed by many companies, we find closed technologies supplied by different companies. Starting with the operational system, we can find processes to automate in Windows, Linux or MacOS.
In the case of the most popular desktop system, Windows, the applications are binary files whose interpretation is a lot harder than a web page. Besides, the final graphic interface presented to the user may be provided by Windows native GUI, multiplatform GUI Toolkits or virtual machine constructed environments like Java.
One approach to deal with all of those scenarios in a desktop environment is to recognize the graphic interface components with computer vision, and interact with them through the same interface used by the final user: mouse and keyboard events.
Here, we shall use BotCity Studio and BotCity Framework, and you can create your account here.
A Practical Example
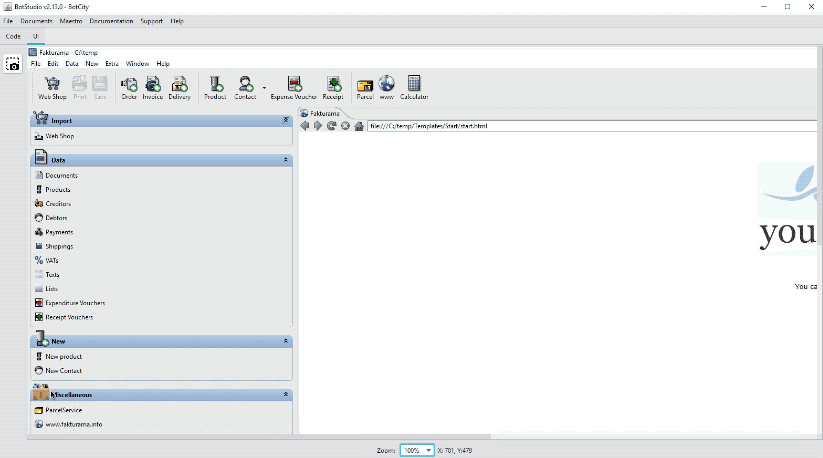
Let’s see a practical example and show how the robot interacts with the interface components in a Desktop environment. Below is a screenshot of Fakturama, a business based application to create invoices, delivery notes, orders, reminders, and more.

If we want to click in the “New product” option, we can grab a cut of this interface element, generating an image to identify it using a Desktop RPA framework:
In this case, we are using BotCity Framework. The code used to find and click at this element on the screen is the following:

Internally, BotCity Framework constantly sweeps the screen in search of the component containing that visual representation and, when it has been found, a click event is generated at the component’s position. The matching parameter is the confidence level and waiting_time is the time limit in milliseconds of the search. Therefore, the developer does not work with fixed coordinates within the source code. Rather, they are determined by computer vision algorithms at runtime. This way, even if the component appears in a new position, perhaps because a new item was inserted into a menu, the automation keeps working.
You may request a new community license of BotCity Studio and try building with it.
The same principle of seek and click can be used for any other interface component, even for information input components. Now, let’s suppose we want to insert a new value in text box below:

To do that, we we’ll cut out a visual representation of the label related to the text box:

In this case, however, we won’t be clicking at the label, but beside it, using the code below:

The click_relative method performs a click at a position x pixels to the right (or left, if negative) and y pixels below (or above, if negative) the position of an anchor object — in this case, the label. After that, to insert data in the text box, you can use the paste("name value") which outputs a string straight from the clipboard.
But you must be asking yourself just how laborious it would be to cut out all those visual elements, right? And imagining how you would need to use image editors, remember to save the files, etc… To ease that part of the process, there is the BotCity Studio, a complementar tool for your development IDE that allows you to collect screenshots, cut out visual representations for the components and generate the source code automatically.
The animation below shows the moment a developer cuts an interface component using BotCity Studio and the component’s image and source code to find it are automatically generated.
Full Process Example
In the video below, I show you how to create a desktop robot to automatically register new products using Fakturama.
In less than 15 minutes the automation flow is produced. It is worth checking it out!
Conclusion
In this article, we have discussed the differences between automations in Web and Desktop environments. For web automations, the challenges are smaller because the technologies are open and allow for an easy time creating automations. In the Desktop environment, we must resort to more sophisticated solutions to interact with the different technologies used on it.
We have shown how this technology works and how to create Desktop automations using the BotCity Framework and the BotCity Studio.